StreamSync-VideoConferencingApp
In today's world of remote communication, building your own video conferencing app is a great way to learn real-time web technologies. As part of my full-stack training, I created a Zoom/Google Meet like platform that enables users to create and join meetings, share audio/video in real time, and communicate seamlessly.
The main technology powering the live video and audio calls in this app is WebRTC, and in this article, we'll deep dive into how I implemented the peer-to-peer connection layer, with the help of a custom signaling server built using Socket.io.
#WebRTC
WebRTC (Web Real-Time Communication) is a technology that enables browsers to establish peer-to-peer (P2P) connections for real-time video, audio, and data transfer — all without needing any plugins or third-party software.
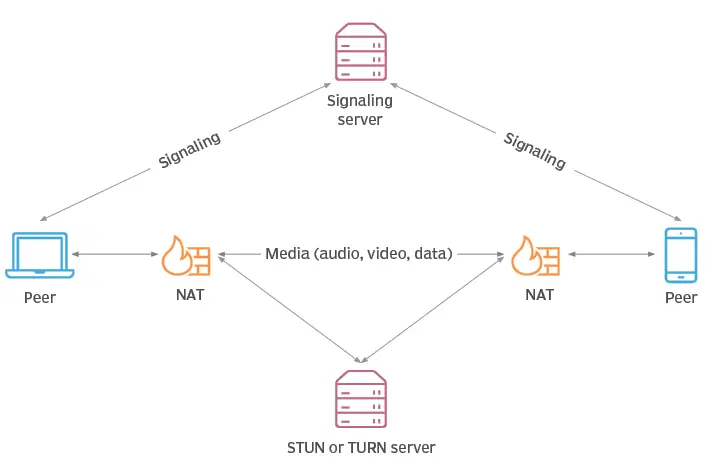
But while WebRTC handles media transfer, it doesn't know how to find or connect users. That's where a signaling server comes in.
#Signaling Server
WebRTC requires peers to exchange certain metadata before they can establish a direct connection. This includes:
-
SDP (Session Description Protocol): Describes the media configuration of each peer (codecs, formats, etc.)
-
ICE Candidates: Network information needed to traverse NAT/firewalls and make the connection work
Since browsers cannot exchange this information by themselves, we use a signaling server — a simple backend (in our case, powered by Socket.io) that helps two clients communicate this data before WebRTC takes over.
#The WebRTC Connection Flow
Let's go step-by-step through how I built the peer-to-peer connection system for the app.
1. Get Local Media
const stream = await navigator.mediaDevices.getUserMedia({ video: true, audio: true });localVideo.srcObject = stream;
2. Connect to Signaling Server (Socket.io)
Once the app loads, it connects to the Node.js + Socket.io signaling server:
const socket = io('https://your-server.com');socket.emit('join-room', roomId);
When a user joins a room, the server places them in a room (like a lobby), allowing them to find and communicate with other participants.
3. Create a WebRTC PeerConnection
We create a RTCPeerConnection with optional STUN servers to help find public IP addresses:
const peer = new RTCPeerConnection({iceServers: [{ urls: 'stun:stun.l.google.com:19302' }]});
Then, we attach our local media tracks (video and audio):
localStream.getTracks().forEach(track => {peer.addTrack(track, localStream);});
4. SDP Offer/Answer Exchange via Signaling
Now comes the key step: exchanging SDPs.
Caller (Peer A)
Creates an SDP Offer -> Set it as Local Description -> Send it via Socket
const offer = await peer.createOffer();await peer.setLocalDescription(offer);socket.emit('offer', { offer, to: remoteUserId });
Receiver (Peer B)
Recieves offer -> Set it as Remote Description -> Create an SDP Answer -> Set it as Local and Send back
socket.on('offer', async ({ offer, from }) => {await peer.setRemoteDescription(new RTCSessionDescription(offer));const answer = await peer.createAnswer();await peer.setLocalDescription(answer);socket.emit('answer', { answer, to: from });});
Caller receives the answer:
socket.on('answer', async ({ answer }) => {await peer.setRemoteDescription(new RTCSessionDescription(answer));});
This completes the initial handshake: both peers now know how to speak to each other.
5. ICE Candidate Exchange
Once the connection is starting to form, each peer gathers ICE candidates (network info) and sends them to the other peer via the signaling server:
peer.onicecandidate = (event) => {if (event.candidate) {socket.emit('ice-candidate', { candidate: event.candidate, to: remoteUserId });}};
On receiving ICE candidates:
socket.on('ice-candidate', ({ candidate }) => {peer.addIceCandidate(new RTCIceCandidate(candidate));});
These ICE candidates help the peers find the best possible route (direct or via NAT traversal) to communicate.
#Final Thoughts
Building this system taught me how real-time technologies work under the hood. WebRTC is incredibly powerful, but also requires you to understand network topology, browser limitations, and asynchronous signaling.
By combining WebRTC with Socket.io, I created a lightweight yet functional peer-to-peer video chat platform — something that can be extended into a full-fledged product with features like screen sharing, recording, and chat.
If you're looking to dive deeper into real-time web apps, building your own signaling and WebRTC-based system is one of the best projects you can try.